In today’s fast-paced world, we often find ourselves juggling between multiple tasks from morning to evening. This hectic lifestyle can lead to irregular dietary habits, lack of exercise, insufficient sleep, and overall unhealthy living. To counter these effects and maintain a healthy life, it is crucial to focus on boosting our immunity.
Practising Yoga can be a powerful tool to boost immunity. Integrating Yoga into daily routine can help fend off disease. Additionally, it helps to enhance overall mental well being and reduces stress.
Let us understand more about 5 Yoga asanas (postures) that can help boost immunity.
((Do not start doing Yoga poses directly. Prepare your body first by doing Sukshma Vyam or exercises to loosing up))
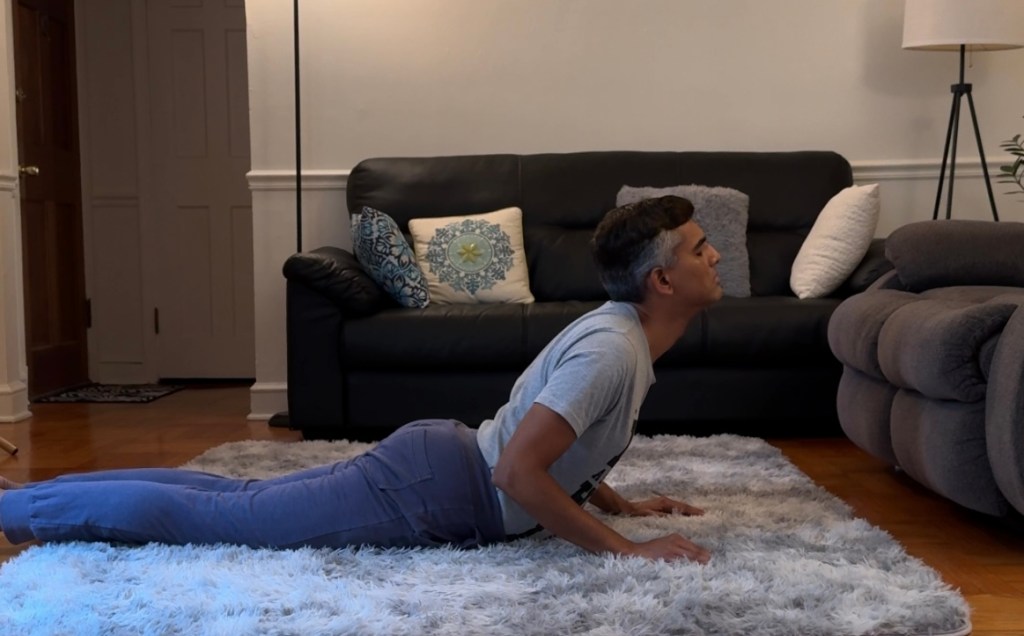
Bhujangasana (Cobra Pose)
Bhujangasana is also known as ‘Cobra pose’. This is a back-bending posture. This pose expands your chest and helps enhance respiratory function with deep breathing.
How to do it?
Lie flat on your stomach. Legs are straight, feet together and soles of the feet uppermost.
Place the palms on the floor, slightly near the shoulder and pointing forward.
Elbows point backwards and close to the sides of the body.
Rest the forehead on the floor, and relax your body, especially your lower back.
Tilt the head backwards. Now chin is pointing forward.The Back of the neck is compressed.
Raise the head, neck and then shoulders. Slowly straighten your elbows, then the arms to raise the trunk and arch backwards.
In the final position, make sure the public bone remains in contact with the floor. ((Navel not more than 3 cm from the ground))
The final position helps you to breathe deeply. Stay in this position for 5-10 breaths. While exhaling lower the trunk and rest your head on the floor.
Benefits
The chest is expanded which helps open up the lungs. Lung capacity is increased and improves breathing. This helps boost respiratory function. Bhujangasa is beneficial for those suffering from asthma and bronchitis.
This pose helps alleviate lower back pain. Also strengthens the spine muscles and improves flexibility.
Beneficial for all the abdominal organs. Especially liver and kidney. Alleviates constipation and boosts a healthy digestive system.
Additionally, tone the ovaries and uterus. Helps with menstrual and other gynecological disorders.
((Avoid if you have back injuries, ulcers, undergone surgery, Intestinal Tuberculosis, hernia. Consult with a medical practitioner before practising))
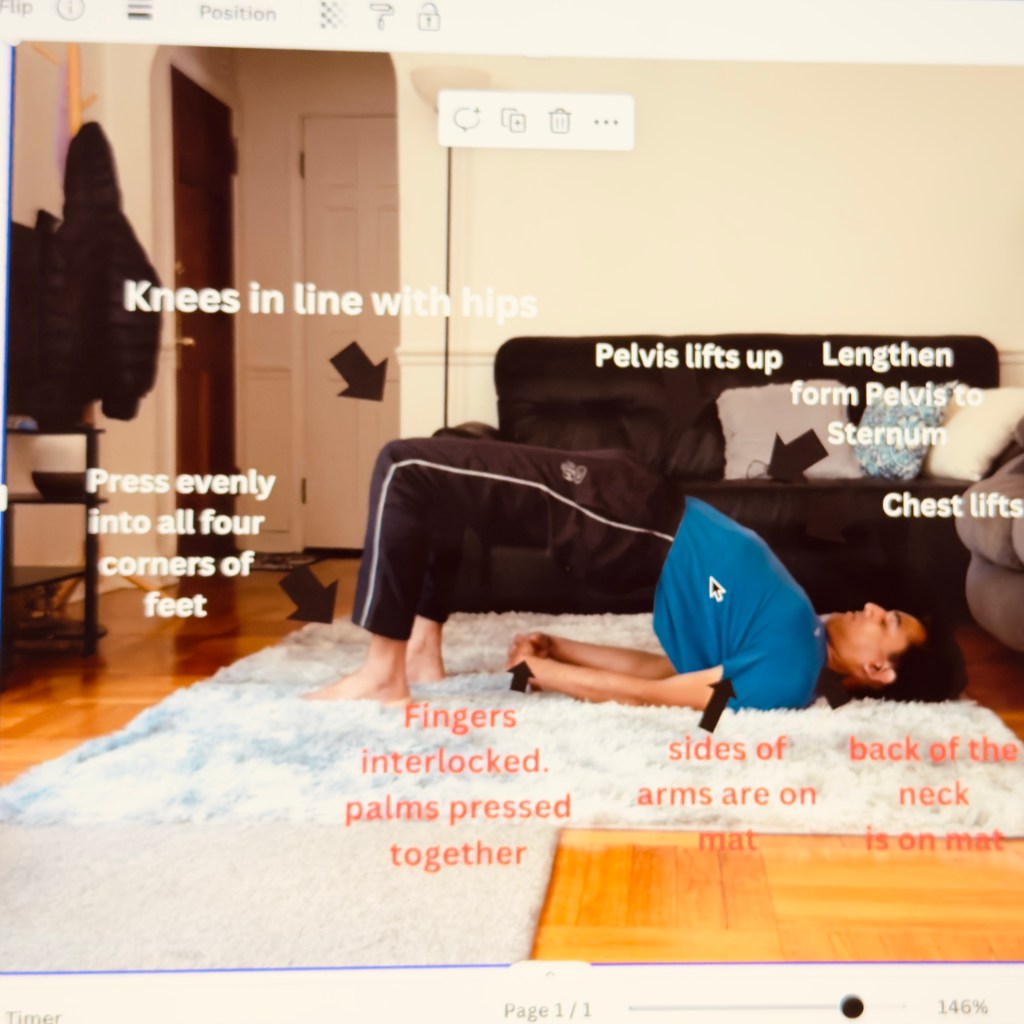
Setubandhasana (Bridge Pose)
Setubandhasana is called as ‘Bridge pose’. It is particularly effective for stretching the spine, opening the chest, and stimulating the abdominal organs.
How to perform?
Lie flat on the mat. Legs straight and arms on the side of the body.
Bend your knees. Place your feet on the floor, near the buttocks, hip-width apart. Make sure ankles and feet are in a straight line.
Inhale and lift your back off the floor. Roll the shoulders in, and make sure your chin touches the chest. Let the shoulder, arms and feet support the weight.
Interlock fingers, firm up buttocks and tighten them up. Push your bands firm on the ground and try and raise the higher.
Hold the final position for 5-10 breaths and keep breathing normally.
Exhale and release the pose.
Benefits
This posture opens up the chest, expands the lung’s capacity and improves respiratory function. Beneficial for people with asthma or other respiratory issues.
Strengthens the back, buttock and thigh muscles. Help increase spine flexibility.
Stimulates the abdominal organs aiding digestion.
Reduces stress and anxiety. Deep breathing clams the mind.
((People with neck injuries must avoid doing this. Pregnant women must avoid or consult the doctor. If you have back injuries do not practice this posture))
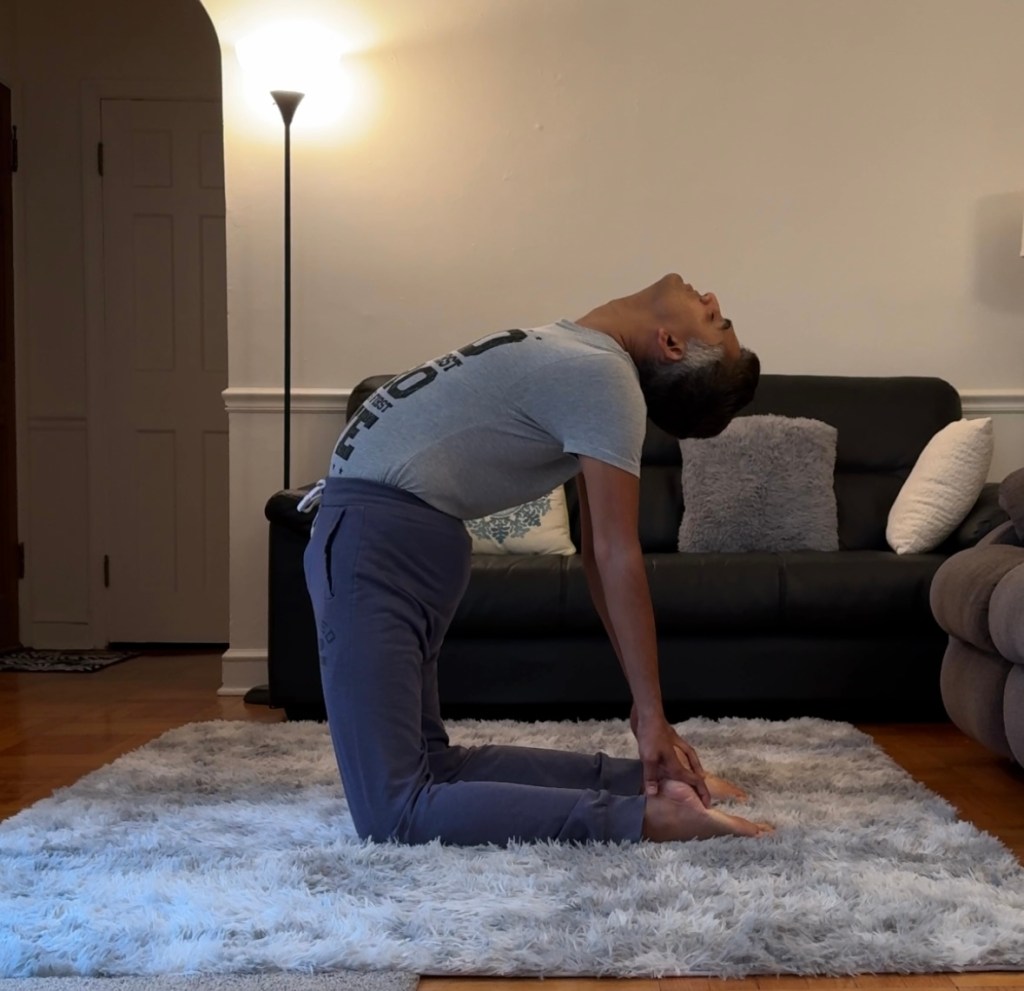
Ushtrasana (Camel Pose)
Ushtrasana is a back-bending pose. This aasan also helps to open the chest and expand the lugs. Also, strengthen the spine and gives a good stretch on the abdominal area.
How to do it?
Starting position is Vajrasana.
Stand on your knees. Feet shoulder width apart. Arms on the side of the body.
While exhaling Arch backwards and try and reach the right heel with the right hand and then the left heel with the left hand.
Try and push your hips forward. Thighs are vertical to the ground. Do not stress or strain your back.
Arch the back as comfortably as possible, lift the chest higher and drop the neck backwards.
Hold the final position for 5-10 breaths.
While coming back. Release the grip on the heels. Inhale and lift the torso and then the head. Sit on your heels in the Vajrasana position and take a deep breath.
Benefits
This posture opens up the chest and expands the lungs increasing the lung capacity. Beneficial for people with respiratory issues.
Stretches and strengthens the spine improving flexibility. Help alleviate lower back pain.
Stimulates the nervous system and increases blood circulation, boosting energy levels
Stimulates digestive organs aiding digestion.
Deep breathing helps reduce stress and clams the mind.
((People with chronic back pain, cervical injuries, blood pressure, stroke, knee issues and heart ailments avoid practising this))
Balasan (Child pose)
Balasana is an excellent posture for calming the mind and reducing stress and anxiety. Deep and slow breathing helps calm the mind. It also gives a gentle stretch to the back, shoulders, and spine muscles, helping to relieve tension and stiffness.

How to perform Balasana?
Kneel down on the floor with the toes of the feet together and knees hip-width apart. Rest your palms on the thighs and buttocks placed on the heels.
Exhaling forward lower your torso between the knees. Extend your arms straight in the forward direction with your torso, palms facing down.
Keep your head on the ground and rest in the position as comfortably as you can.
Benefits
A gentle stretch to the back, shoulders, and spine muscles helps to relieve tension and stiffness.
Excellent posture for calming the mind and reducing stress and anxiety
Help alleviate fatigue and restore energy
Compresses abdominal muscles and help stimulate digestion.
((This is a forward bending pose. People with heart issues or high blood pressure should avoid it. Also people with spine, ankle or knee injuries should not do it))
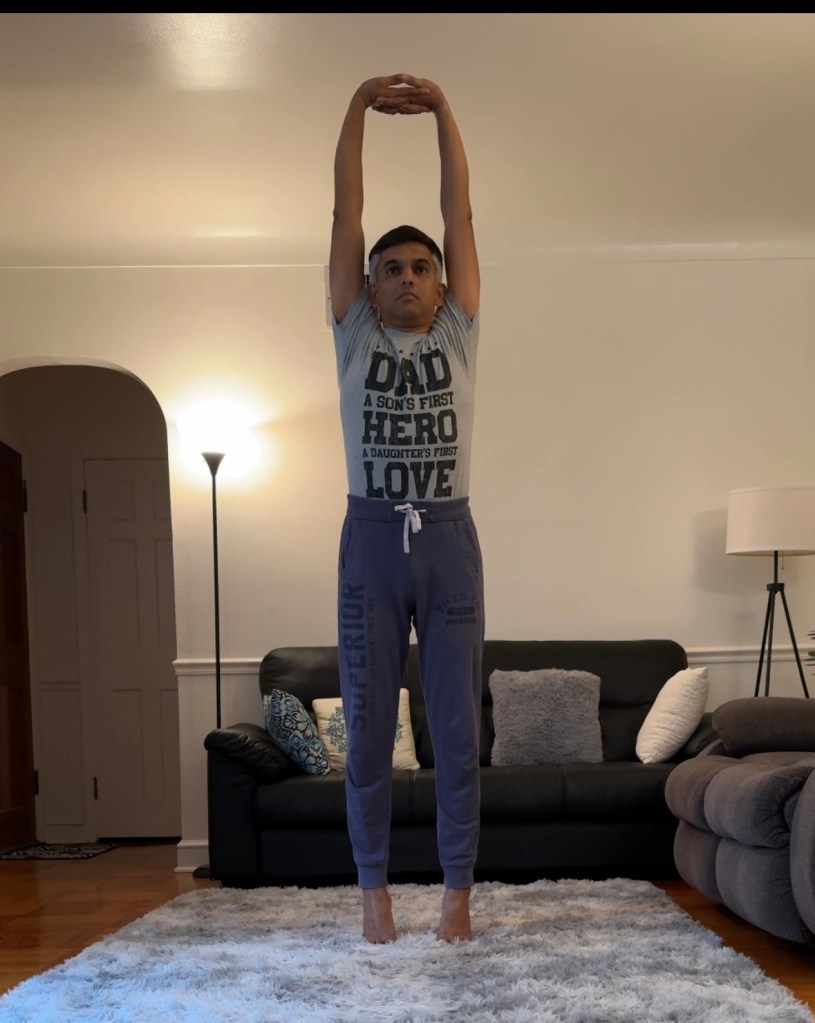
Tadasana (Plam tree pose)
This yoga aasan helps stretch the spine and clears the congestion in the spinal nerves. It is a standing aasan. Very simple yet gives a lot of benefits.
How to do it?
Stand with feet two inches apart. Arms by the side of the body.
Raise the arms above the head, interlock the fingers and palms upwards.
Look forward and gaze at an object in front of your eyes.
Inhale and stretch the arms, shoulders and chest upwards. This will give a good stretch to the spine.
Breathe normally and hold the position for 5-10 breaths.
Lower the heels, bring the hands down and relax.
Benefits
Stretches the spine and helps clear the congestion in the spinal nerves.
Helps correct poor posture by aligning the spine and improving overall body alignment.
Strengthens the muscles of the legs, including the thighs, calves, and ankles.
((Ankle or leg injury avoid it. Any other health issue consult a doctor before doing it))
Kapalbhati (Frontal brain cleaning)
Swami Muktibodhananda, in “Hatha Yoga Pradipika” (HYP), describes it as “invigorating the entire brain and awakening the dormant centers responsible for subtle perception.”
In layman’s language, Kapalbhati is frontal brain cleansing. When you breathe normally, your inhalation is active and your exhalation is passive. But in Kapalbhati, this process is reversed: active exhalation and passive inhalation.
How do I perform Kapalbhati?
In Kapalbhati, the yoga practitioner forcefully exhales the air, but the inhalation is subtle or passive. Hath Yoga Pradipika says, “Perform exhalation and inhalation rapidly like the bellows of a smith.”
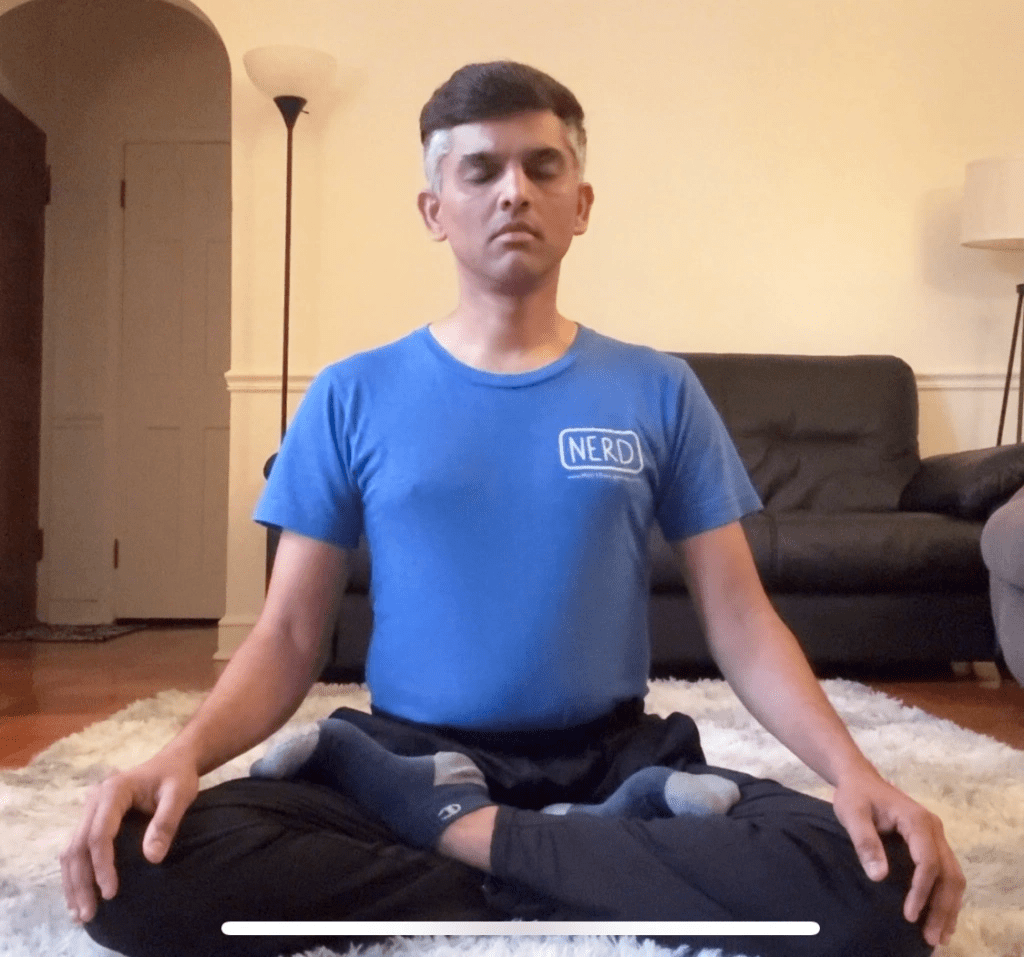
1- Sit comfortably in padmasana (Lotus pose) or sukhasana. Your spine should be erect. Palms on the knees facing upwards or in the chin Mudra and shoulders relaxed. Close your eyes and let your breath be normal.
2- Take a few normal breaths. Bring your attention to breathing. Then take a deep breath in and exhale the air forcefully out of your lungs.
3- Keep doing fast respirations through both nostrils, exhaling rapidly but inhalation should be passive, not active. As described in HYP, inhalation should be the reaction of the forceful exhalation.
4. While doing this practice, keep your facial muscles relaxed.
5- Do 10 exhalations to begin with and then gradually increase the number to 20 and then 50.
As you forcefully exhale, your abdominal muscles contract. Be aware that you are not actively inhaling after the forceful exhalation.
Try and see a shining light in front of your forehead.
If you are feeling dizzy after performing this, then you are exhaling too forcefully. Stop the practice and sit quietly for a few minutes. Awareness is very important during this practice.
After completing the first round, take a deep breathe in and observe the effects of this kriya on your body and mind.
What are the benefits of Kapalbhati?
According to Hath Yog Pradipika, Kapalbhati destroys all mucous disorders. It is also called the destroyer of ‘Kapha’.
The toxins in the upper respiratory tract are thrown out of the body.
It also helps the facial muscles and nerves to relax. According to The Yoga Institute (Mumbai), it also helps rejuvenate tired cells and nerves, so the face looks brighter and younger.
It helps clear sinuses and reduces migraine and sinusitis attacks.
Kapalbhati is an ideal preparation for meditation. Those who wish to achieve progress in meditation should practice Kapalbhati before meditating.
Kapalbhati makes the mind peaceful and receptive.
Anulom Vilom (Alternet nostril breathing)
Anulom-Vilom is a popular breathing technique in Yoga. Practising this technique will help balance prana (life force) in the body. This also has a calming and balancing effect on the body.
How to do it?
Sit in Padmasana (Lotus pose) or Sukhasana (Cross leg pose) or Siddhasana. These yoga postures are meditative poses.
Relax your shoulders. Close your eyes and take a deep breath before starting.
Left hand in chin mudra or dhyan mudra.
Close your right nostril with your right-hand thumb, and inhale slowly from the left nostril. Then close the left nostril and exhale from the right. Then inhale from the right and exhale from the left. Repeat the same process for 5-10 breaths.
While breathing inhale and exhale counts should be the same. Example: If you are inhaling 5 counts and exhale for 5 counts. This ratio is called 1:1.
Benefits
Balance the sympathetic and parasympathetic nervous systems. Calms the mind.
Increases lung capacity and helps improve respiratory function.
Increases oxygen supply to the brain, enhancing mental clarity, focus, and concentration.
((This blog reflects the explanations and teachings of my Yoga instructors. Please consult your own Yoga teacher before attempting these practices.))
