The sun is not merely a distant celestial object it is an essence of life. In Vedas, known as the sacred texts of Hinduism, the ‘Sun’ is worshipped as a god of energy and an architect behind the creation of the material universe.
In ancient times, the sun held profound symbolic significance as a beacon of positivity, spiritual consciousness, self-realization and inspiration. Daily worship of the sun was a common practice, and ‘Surya Namaskar’ was one of the primary rituals.
Surya Namaskar is not an Aasan. It’s a form of offering prayers to the sun through a sequence of yoga postures.
Let us begin our journey to delve deep into understanding this timeless practice, its physical benefits and spiritual significance.
Surya Namaskar
In Sanskrit (an ancient language in India), the sun means ‘Surya’ and ‘Namaskar’ means ‘Salutations’. The sages (Sadhus), in ancient times, performed these yogic poses as a means of offering their prayers to the sun. Since then, this tradition of offering prayers to the sun has been passed on from generation to generation.
In Yoga, the sun symbolises the ‘Pingala’ nadi, also known as ‘Surya nadi’, the pranic channel that carries the vital life force. The regulation of Pingala nadi helps balance the vital force of energy on the physical and mental levels.
Is Surya Namaskar an Aasan?
NO! Surya Namaskar is not an Aasan. However, this dynamic group of Aasanas effectively help to loosen the body, stretch the muscles and tone the joints. These active yoga postures also facilitate a good massage to the internal organs in the body.
Surya Namaskar or Sun Salutations are also known as a complete Sadhana. It includes Aasans or Yoga postures, pranayam, chanting of mantras and meditation. It is an excellent way to begin your morning routine.
Who should not do Surya Namaskar?
As we all know, Surya Namaskar has enormous positive effects on one’s physical and mental well-being. But, under certain circumstances, you should not perform Surya Namaskar. These conditions are called contraindications. Before moving ahead, let us understand what are these contraindications first.
If you have a fever or feeling feverish or have inflammation in the body you must discontinue the practice till you feel better.
Patients suffering from high blood pressure (BP) or heart disease and a history of stroke should not perform these postures, as they may damage the heart or blood vessel system.
Those who are suffering from hernia and intestinal tuberculosis should not practice it.
Pregnant women must consult the doctor before performing Surya Namaskar during the pregnancy period. During menstrual cycles, it should be avoided at the onset of menstruation.
Surya Namaskar is a synchronisation of forward and backward bending yoga postures. So all the contraindications for forward and backward bending postures apply.
Benefits of Surya Namaskar?
Surya Namaskar is a whole-body workout and it must be practised with an empty stomach. The ideal time for practising Surya Namaskar is in the morning, after sunrise.
It helps strengthen the back muscles and improves flexibility.
Stimulates and balances metabolism, circulatory system, digestive system, reproductive system, and respiratory system.
Helps boost energy levels and reduces stress.
Dynamic movements in sync with appropriate breathing help to pump fresh oxygenated blood to the brain.
Before commencing the practice of Surya Namaskar, awareness of the whole body is very important. Stand with your feet together or slightly apart, balance your weight equally on both feet and gently close your eyes. Inhale through your nose, and as you exhale, feel your complete body firmly rooted into the ground. Bring your awareness to your breath and relax the whole body and mind.
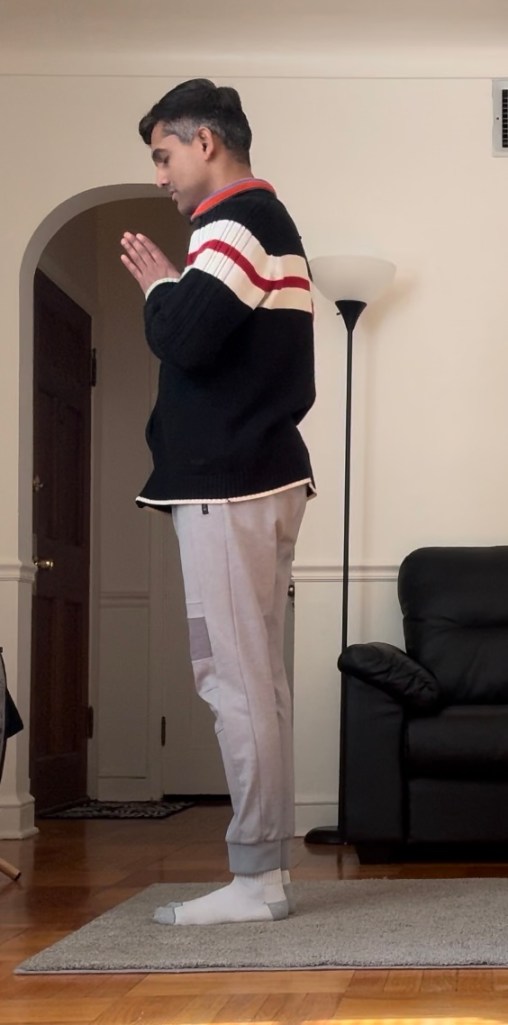
Position 1: Pranamasana (Pyarer Pose)
As you inhale, raise your hands from the elbow and join them in a Namaskar or prayer position close to your chest. Keep your eyes closed and feet together. Here, you can chant a Mantra, ‘Om Mitraya Namah’ (Mitra is the name of the Sun). Make sure you are breathing normally. In a spiritual context, your attention is on the ‘Anahat’ Chakra or Heart Chakra. Benefit: Concentration and calmness of the mind
Position 2: Hasta Uttanasana (Arms raised pose)
Mantra: ‘Om Ravaye Namah’.
As you Inhale, raise both arms above your head and separate them shoulder-width apart. Tilt your head, arms and trunk slightly backwards. You will feel a good stretch in the abdomen area. Here you will also feel your chest and lungs expanding. On a spiritual level, your attention is on the ‘Vishudhi’ Chakra or throat Chakra.

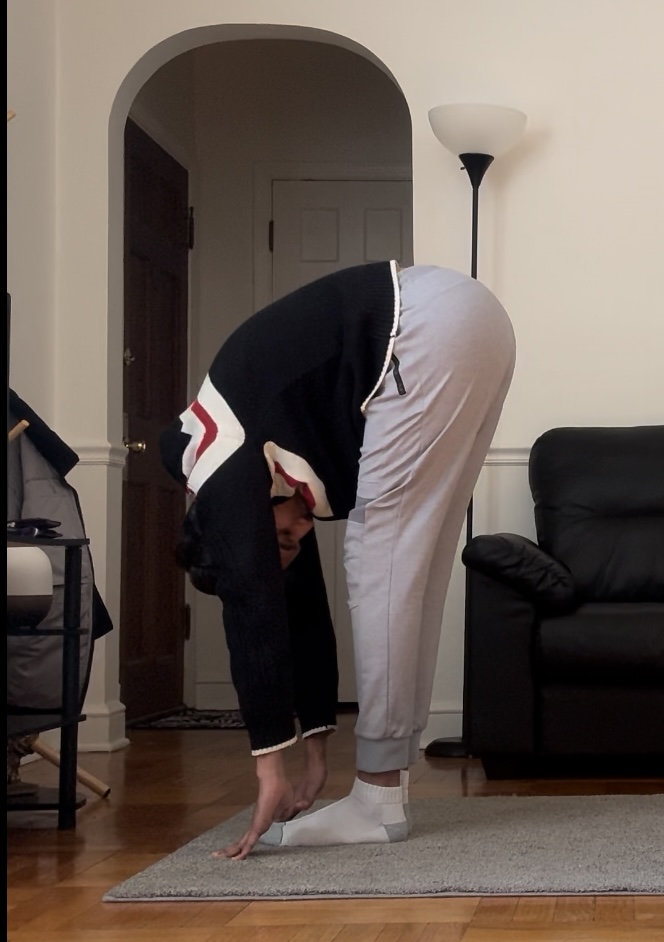
Position 3: Hasta Padasana or Padahastasana (Hands touching to foot pose)
Mantra: ‘Om Suryaya Namah’
While exhaling slowly bend forward. Try and touch the floor with your fingers or if possible you can rest the palm side of your feet. Please make sure, while bending forward, you should bend forward from the hip. Bring your forehead closer to the knees. Keep your knees straight. Do not bend them! See to it that you don’t over-stretch or strain yourself!! Reach towards the ground, as much as you can, and hold the final position comfortably for five breaths. Bring your awareness on the back and the pelvic region. On a spiritual level, your attention is on the ‘Swadhistan’ Chakra. This is the second energy Chakra in your body, situated as the back of the spine.
Contraindication: People with high BP, heart ailments, stroke patients, and patients with back injuries should not do this aasan.
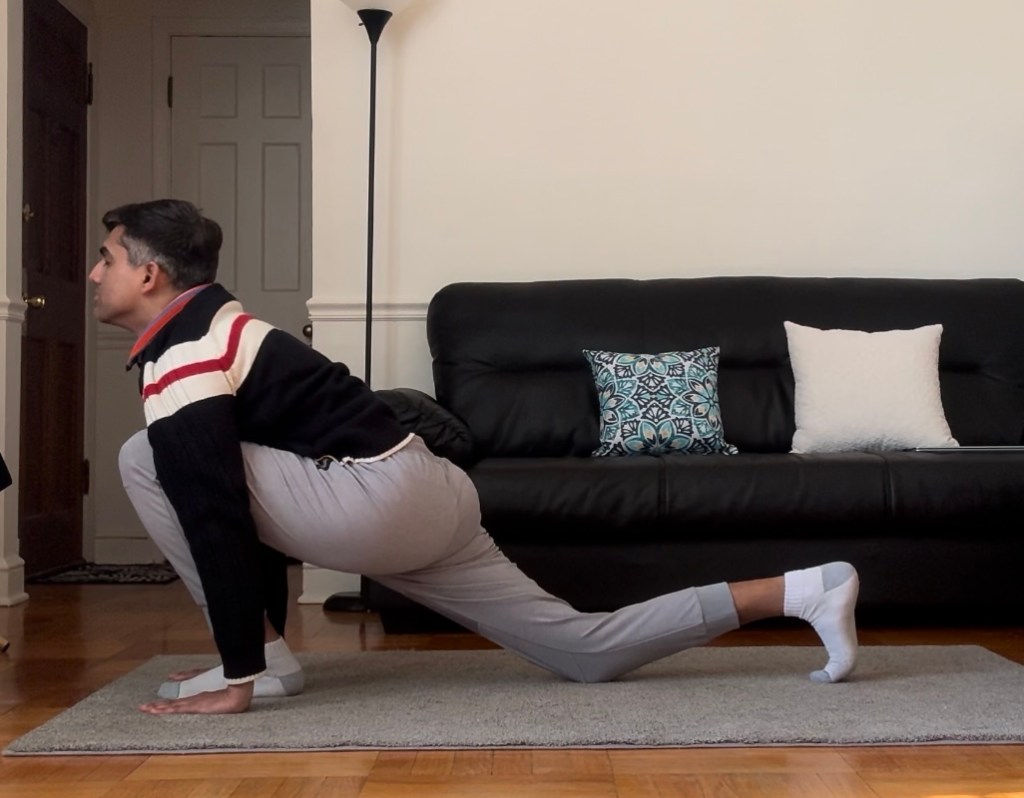
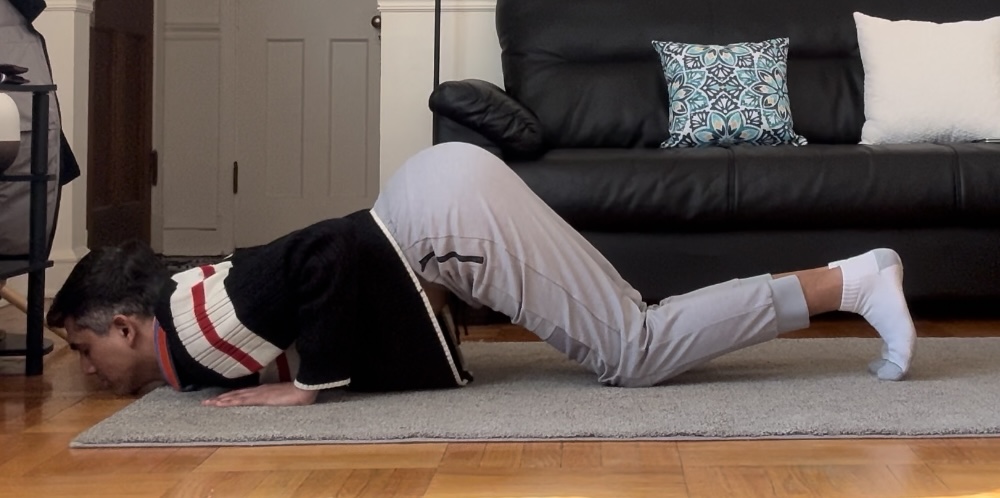
Position 4: Ashva Sanchalanasan
Mantra: On Bhanave Namah
Inhale and push your right leg backwards. Place the toe pointing downwards and your knee touching the floor. Bend the left foot, such that your knee will be pointing forward (as shown in the image below). Both firmly grounded hands, aligned on either sides of your left foot, will bear your weight. Head should be slightly tilted backwards and an arch formation should be felt in your back. Hold this position for five normal breaths. On the physical level, this will help to get a good stretch, starting from your back to the thigh and extending slightly towards your lower back. On spiritual level, your awareness should be on the ‘Ajnya Chakra’ or between the two eyebrows.
Contraindication: If you have pain or an injury in the knee or ankle, full stretch is not advisable.
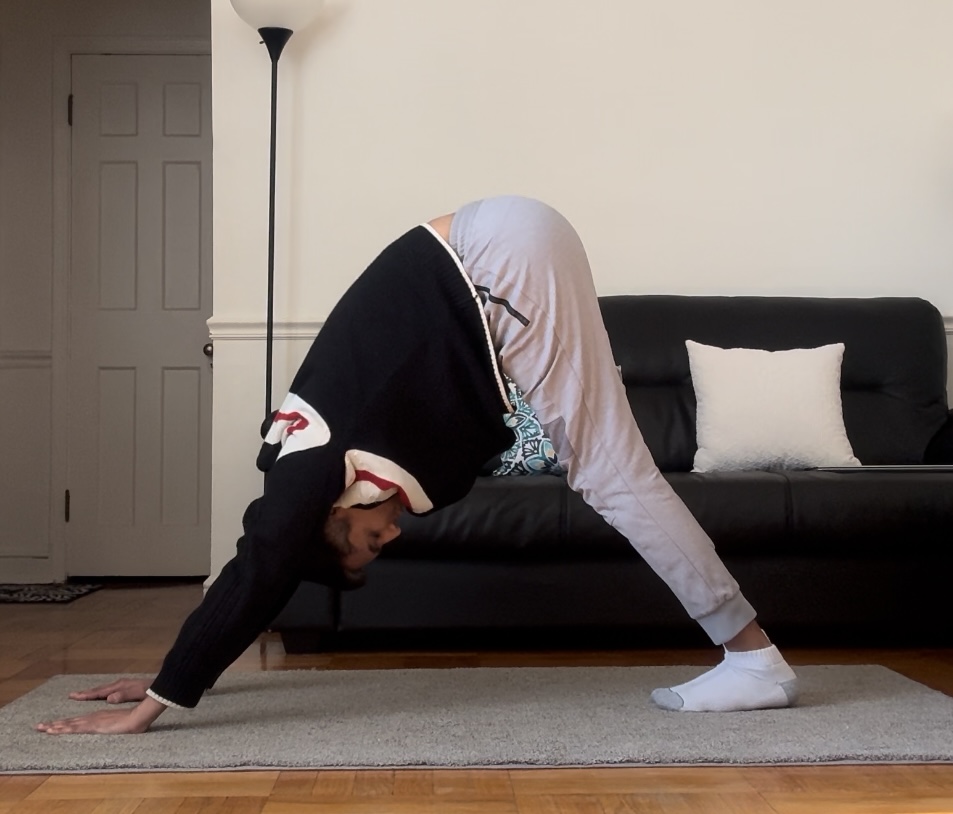
Position 5: Parvatasana (Mountain Pose)
Mantra: ‘Om Khagaya Namah’
As you exhale, lift your left foot and place it near your right foot. While doing this, raise your buttocks and bring your head between the arms. Your heels should be touching the floor. Straighten your arms and legs and hold this position for about five breaths. Breath normally!!! See you have formed a triangle. Gradually, try to bring your head towards your knees. Reach to the point as per your comfort. On the physical level, your awareness is on back of your thigh, throat region, and shoulders. Parvatasana is an inverted posture, so all the contraindications of inverted posture will apply.
This Aasan has a lot of benefits: It strengthens the back muscles. Also, helps increase the height as muscles are stretched. Apart from this, blood circulation in the spine and upper shoulder part is also stimulated.
Position 6: Ashtang Namaskara (Salutations with eight limbs)
Mantra: ‘Om Pushne Namah’
In this posture, eight parts of your body touch the floor, which is why it is called Ashtang Namaskar. Your hands and feet will remain in the same position. Lower your knees, chest and chin towards the ground. As you do so, your buttocks will rise up. In the final position, palms, knees, chin, chest, and toes are on the floor. Observe that all the eight parts of your body are touching the ground at the same time. For those who can’t do this, lower the knees first, then, the chest and chin. In the final position, there is no inhalation or exhalation. On the physical level, bring your awareness to the arch in your back and the abdomen. The spiritual awareness in this position is at the ‘Manipur’ Chakra. The energy channel located in two fingers beneath the belly. Those who are suffering from High BP, heart ailments, serious back issues should not do this posture.
This posture strengthens the arms and leg muscles, as well as it is good for the chest area and spine.
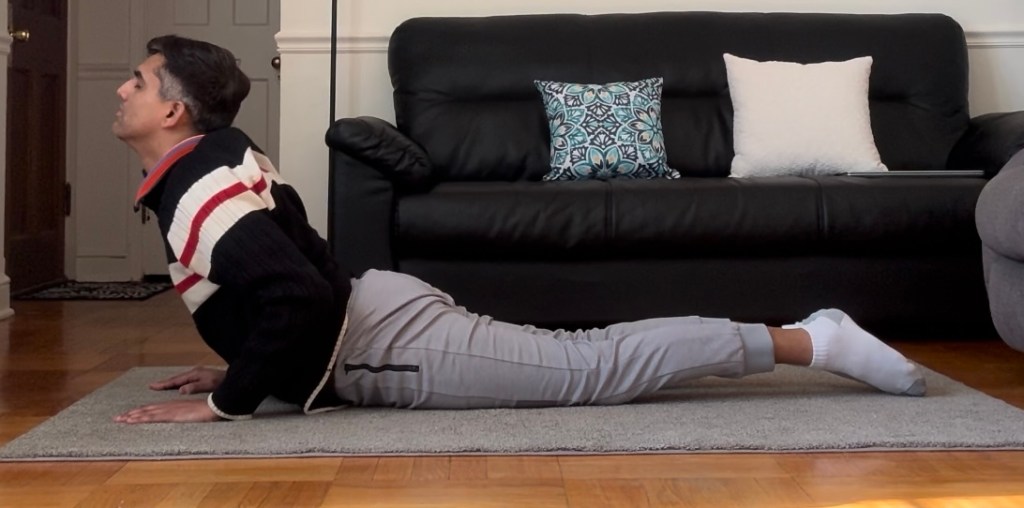
Position 7: Bhujangasan (Cobra Pose)
Mantra: ‘Om Hiranya Garbhaya Namah’
In this position, your hands and feet will remain in the same spot. Slide the chest forward, as you inhale and lift your head first, then straighten your shoulders and elbows. You will observe an arch in the back. Try and tilt the head towards your back slowly. Don’t strain your neck!! Hold the position wherever you find yourself comfortable. Thighs and hips should remain on the ground, and make sure that your arms support your trunk. Here, the physical awareness will be on the spine and spiritual awareness will be on ‘Swadhistan Chakra’, the energy channel located at the base of the spine. Individuals having hernia, peptic ulcers, intestinal TB, or hypertension should not perform this posture. The practice of Bhujangasan will be helpful for those who are suffering from lower back pain as it help relive the tension.
Position 8: Parvatasana (Mountain Pose)
Mantra: ‘Om Marichaya Namah’
Hands and feet will remain in the same spot. As you exhale lift your buttocks up, straighten the arms and legs, heels touching the floor. Reach and hold the position the same as position 5.
Position 9: Ashva Sanchalanasan
Mantra: ‘Om Adiytaya Namah’
As you inhale, bend the left leg, bring it towards the front, and place it where your hands are touching the ground. Bend your right knee and let it touch the ground simultaneously. Tilt your neck backwards and observe the arch in the back. Push your pelvis slightly forward. This position has physical awareness and benefits same as position 4.
Position 10: Hasta Padasana or Padahastasana (Hands touching to foot pose)
Mantra: ‘Om Savitre Namah’
While coming out from positions 9 to 10, exhale and bring your right leg forward, placing it beside the left foot, in between your hands. Straighten both legs and try to bring your head closer to the knees. This position has the same awareness as position 3.
Position 11: Hasta Uttanasana (Arms raised pose)
Mantra: ‘Om Arkaya Namah’
Inhale and lift your torso from the hip. Arms and legs will remain straight. Stretch the arms towards the ceiling and tilt slightly backwards, forming an arch in the back.
Position 12: Pranamasana (Pyarer Pose)
Mantra: ‘Om Bhaskaraya Namah’
As you exhale, bring your hands down close to your chest, with your palms touching each other in the namaskar position. Stay in this position for five to 10 breaths. Breath normally.
Repeat the positions 1 to 12 again to complete one round of Surya Namaskar. Start the next round with your left leg. After completing the practice or Surya Namaskar, relax your hands and your body. Concentrate on the breathing until it returns to normal. After completing the practice of Sun Salutations, relax in Shavasan or Corpse pose.
Tips for beginners:
Don’t strain yourself, and reach the final position which is comfortable for you. In the first week, start by practising two Surya Namaskars a day. Gradually increase the number every week. Do the stretching exercises and Sukshma Vyayam before performing Sun salutations.
((The information in the article is based on my self practice experience and notes from New Age Yoga Institute-Mumbai))
